Strawberry Crunch Cheesecake: The Best No-Bake Dessert in 4 Hours!
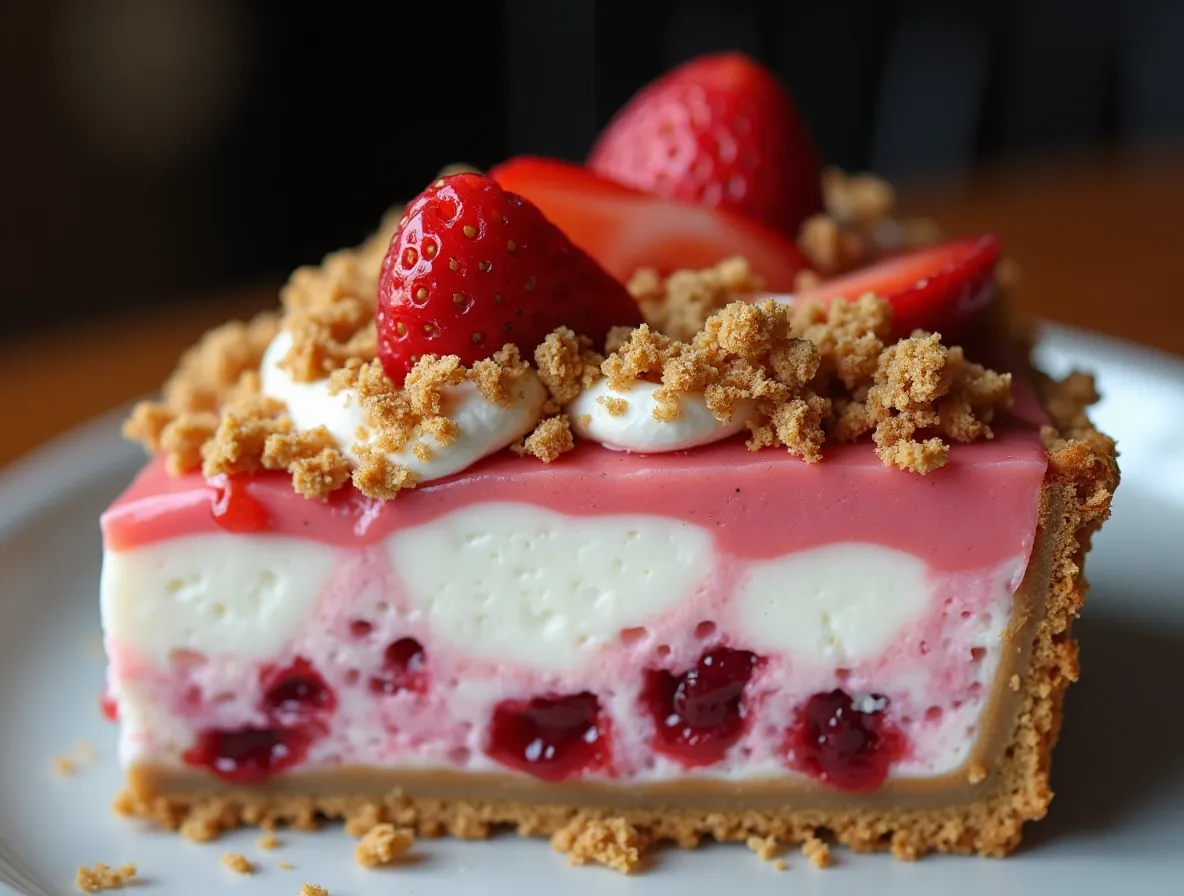
Table of Contents
Introduction: Rediscovering a Childhood Favorite in Cheesecake Form
There’s something undeniably magical about that first bite of a perfectly creamy cheesecake – especially when it’s crowned with a sweet, crunchy strawberry topping that instantly transports you back to childhood summers chasing after the ice cream truck. This Strawberry Crunch Cheesecake isn’t just another dessert; it’s a nostalgic experience wrapped in creamy, dreamy perfection.
Did you know that the strawberry crunch phenomenon actually originated from the beloved strawberry shortcake ice cream bars that debuted in the 1980s? These treats became so popular that their distinctive crumbly topping inspired countless dessert variations. Now, we’re taking that iconic flavor combination and elevating it into a stunning no-bake cheesecake that’s perfect for any occasion.
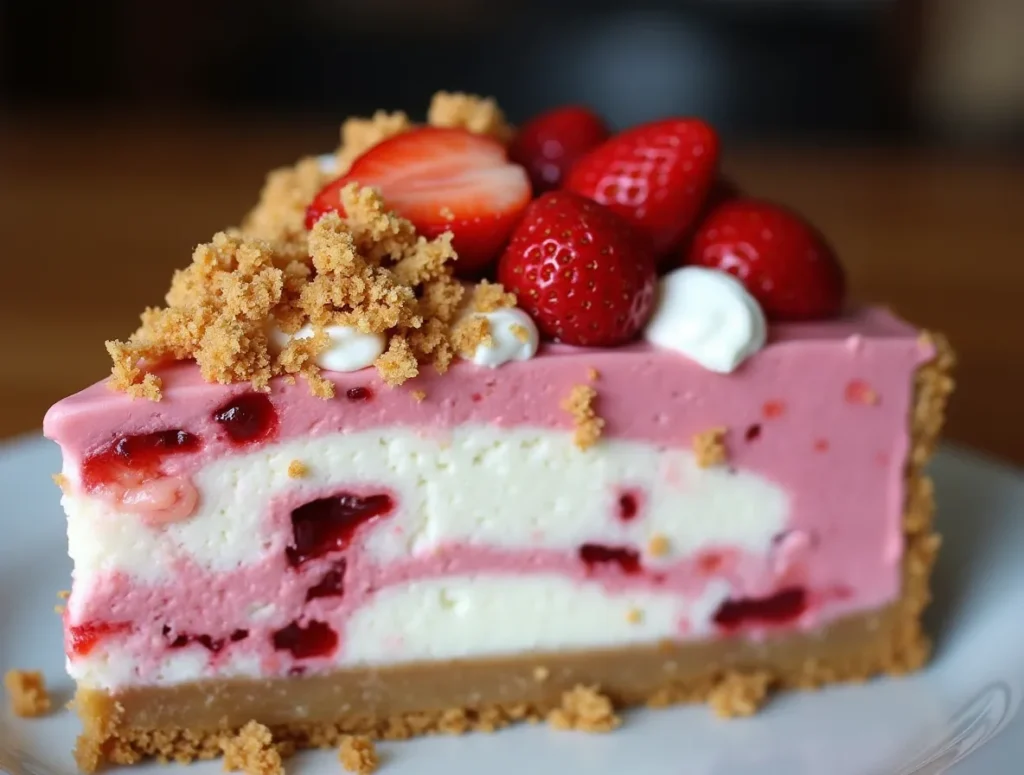
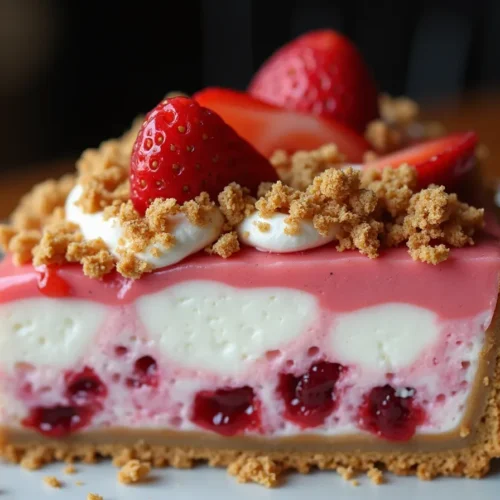
What makes this dessert truly special is its beautiful balance of textures and flavors. The buttery graham cracker crust provides the perfect foundation for the velvety smooth cheesecake filling, while the strawberry crunch topping adds that signature sweet-tart flavor and irresistible crispy texture. Best of all? No oven required! This makes it the ideal dessert for hot summer days when you want something impressive but don’t want to heat up your kitchen.
Why This Recipe Will Become Your New Go-To Dessert
1. Foolproof No-Bake Method for Perfect Results Every Time
Traditional cheesecakes can be intimidating with their water baths and the constant fear of cracking. Our no-bake version eliminates all that stress while delivering equally impressive (if not better!) results. The secret lies in the perfect ratio of cream cheese to whipped cream, creating a luxuriously smooth texture that sets beautifully in the refrigerator.
2. Budget-Friendly Gourmet Dessert
While bakery cheesecakes can cost $30 or more, this homemade version delivers gourmet quality at a fraction of the price. Most ingredients are pantry staples or easily found at any grocery store. The golden sandwich cookies in the topping are an affordable alternative to specialty ingredients, proving that delicious doesn’t have to mean expensive.
3. Customizable for Various Dietary Needs
This recipe is incredibly adaptable. For a gluten-free version, simply use gluten-free graham crackers and cookies. You can even lighten it up by using reduced-fat cream cheese and a low-fat whipped topping alternative. The strawberry flavor can be adjusted to taste by varying the amount of freeze-dried strawberries or gelatin mix.
The Science Behind the Perfect No-Bake Cheesecake
Understanding the why behind the recipe steps will help you achieve perfect results every time:
Crust Chemistry: The combination of graham cracker crumbs and melted butter creates a stable base through starch gelatinization and fat solidification when chilled. The sugar isn’t just for sweetness – it helps absorb excess moisture to prevent a soggy crust.
Filling Physics: The cream cheese provides structure while the whipped cream introduces air bubbles that lighten the texture. The sour cream adds tanginess and helps stabilize the mixture. When cold, the fat molecules in the dairy products firm up to create that perfect cheesecake consistency without baking.
Topping Texture: The freeze-dried strawberries provide intense flavor without adding moisture that could make the topping soggy. The gelatin powder not only enhances the strawberry flavor but also helps bind the crumbs together slightly for better adherence to the cheesecake.
Ingredients Breakdown: Quality Matters
For the Crust:
- Graham Cracker Crumbs (2 cups): You can buy pre-crushed or pulse whole crackers in a food processor. For extra flavor, try cinnamon or chocolate grahams.
- Granulated Sugar (1/4 cup): Helps balance the tartness and creates a crispier texture.
- Unsalted Butter (1/2 cup, melted): Use high-quality butter for best flavor. Salted can work in a pinch – just reduce any added salt in other components.
For the Cheesecake Filling:
- Cream Cheese (16 oz, softened): Full-fat Philadelphia brand works best for texture. Never use whipped or reduced-fat for this application.
- Powdered Sugar (1 cup): Dissolves more easily than granulated and helps create a smoother texture.
- Vanilla Extract (1 tsp): Use pure vanilla for best flavor. Madagascar bourbon vanilla is ideal.
- Sour Cream (1/2 cup): Adds tang and creaminess. Greek yogurt can substitute in a pinch.
- Heavy Whipping Cream (1 cup, cold): Must be at least 36% milk fat. The colder it is, the easier it whips.
For the Strawberry Crunch Topping:
- Golden Sandwich Cookies (20): Golden Oreos are perfect. The cream filling adds richness.
- Unsalted Butter (3 tbsp, melted): Binds the crumbs and adds richness.
- Freeze-Dried Strawberries (1/4 cup, crushed): Provides intense strawberry flavor without moisture.
- Strawberry Gelatin Mix (1/4 cup): Enhances color and flavor. Look for natural options if preferred.
Garnish Options:
- Fresh Strawberries: Choose ripe, fragrant berries for maximum impact.
- Whipped Cream: Homemade is best – whip leftover heavy cream with a touch of sugar and vanilla.
Step-by-Step Masterclass: Professional Techniques for Home Cooks
1. Preparing the Perfect Crust (with Pro Tips)
Tools Needed:
- 9-inch springform pan
- Measuring cups and spoons
- Mixing bowl
- Flat-bottomed cup or measuring cup for pressing
Detailed Steps:
- Crumb Preparation: If starting with whole graham crackers, pulse them in a food processor until fine. Alternatively, place in a ziplock bag and roll with a rolling pin. The texture should resemble coarse sand with no large pieces.
- Butter Melting: Melt butter slowly over low heat or in 15-second microwave bursts. You want it liquid but not hot (about 110°F). Hot butter can make the crust greasy.
- Combining: In a medium bowl, whisk together graham crumbs and sugar. Gradually add melted butter, mixing with a fork until all crumbs are evenly moistened. Test by squeezing a handful – it should hold its shape briefly before crumbling.
- Pan Preparation: For easy removal, line the bottom of your springform pan with parchment paper. Don’t grease the sides as the crust needs to stick.
- Pressing Technique: Pour crumbs into the pan. Using a flat-bottomed cup or your fingers, press firmly starting from the center and working outward. Apply even pressure to create a compact, level base. The sides should come up about 1-inch for structural support.
- Chilling: Refrigerate for at least 30 minutes. This allows the butter to solidify, creating a stable base that won’t crumble when sliced.
Troubleshooting:
- If crust is too dry: Add more butter 1 tbsp at a time
- If too wet: Add more crumbs 1 tbsp at a time
- For extra flavor: Add 1/4 tsp cinnamon or 1 tbsp cocoa powder to the crumbs
2. Crafting the Luxurious Filling
Tools Needed:
- Stand mixer or hand mixer
- Rubber spatula
- Measuring cups and spoons
- Separate mixing bowl for whipping cream
Detailed Steps:
- Cream Cheese Preparation: Ensure your cream cheese is truly softened – leave at room temperature for 2 hours or microwave in 10-second bursts. It should yield gently to pressure but not be melted.
- Initial Mixing: In a stand mixer with paddle attachment (or large bowl with hand mixer), beat cream cheese on medium-low speed until completely smooth, about 2 minutes. Scrape down sides and bottom of bowl thoroughly.
- Sugar Incorporation: Add powdered sugar 1/4 cup at a time, mixing on low speed to avoid a sugar cloud. After each addition, mix until fully incorporated. Once all sugar is added, beat on medium for 1 minute until light and fluffy.
- Flavor Enhancement: Add vanilla extract and sour cream. Mix on low until just combined, then increase to medium for 30 seconds. Overmixing at this stage can incorporate too much air.
- Whipped Cream Preparation: In a separate chilled bowl (metal works best), whip cold heavy cream to stiff peaks. Start on low speed, gradually increasing to high. Watch carefully – you want peaks that hold their shape when the whisk is lifted.
- Folding Technique: Add 1/3 of the whipped cream to the cream cheese mixture. Using a rubber spatula, fold gently by cutting down through the center, scraping along the bottom, and folding over the top. Rotate the bowl as you go. Repeat with remaining cream in two additions.
- Final Texture Check: The mixture should be smooth, fluffy, and hold soft peaks. If it seems too thick, fold in 1-2 tbsp of unwhipped heavy cream to loosen.
- Assembly: Pour filling over chilled crust. Using an offset spatula, smooth the top in a circular motion starting from the center. Tap the pan gently on the counter to release air bubbles.
- Setting Time: Cover loosely with plastic wrap (don’t let it touch the surface). Chill for minimum 4 hours, preferably overnight for best texture.
Advanced Technique: For extra stability, you can add 1/2 tsp unflavored gelatin bloomed in 1 tbsp cold water and melted (cooled slightly) to the cream cheese mixture before folding in the whipped cream.
3. Creating the Signature Strawberry Crunch
Tools Needed:
- Food processor or ziplock bag and rolling pin
- Mixing bowl
- Measuring cups and spoons
Detailed Steps:
- Cookie Processing: Place cookies (with cream filling) in a food processor. Pulse until you have a mix of fine crumbs and some small pea-sized pieces for texture. Alternatively, place in a sturdy ziplock bag and crush with a rolling pin.
- Strawberry Preparation: Place freeze-dried strawberries in a clean bag and crush to a powder with some small pieces remaining. This creates both color distribution and occasional bursts of intense strawberry flavor.
- Butter Melting: Melt butter just until liquid. Cool slightly so it doesn’t melt the gelatin powder.
- Combining: In a medium bowl, mix cookie crumbs, strawberry powder, and gelatin mix. Drizzle in melted butter while tossing with a fork until all crumbs are evenly coated. The mixture should clump slightly when pressed.
- Texture Test: Take a handful and squeeze – it should hold together briefly before crumbling when touched. If too dry, add more butter 1/2 tbsp at a time.
Flavor Variations:
- For more tartness: Add 1 tsp lemon zest
- For deeper berry flavor: Add 1/4 tsp strawberry extract
- For crunchier texture: Add 2 tbsp chopped toasted almonds
4. Final Assembly and Presentation
Tools Needed:
- Cake stand or serving plate
- Offset spatula
- Pastry brush (optional)
- Piping bag for whipped cream (optional)
Detailed Steps:
- Pan Removal: Run a thin knife around the edge of the springform pan. Release the clasp and carefully lift off the ring. If the crust sticks slightly, use the knife to gently loosen.
- Base Transfer: Slide a large offset spatula under the crust to loosen from the pan bottom. Carefully transfer to your serving plate.
- Crumb Application: Place cheesecake on a baking sheet to catch falling crumbs. Take handfuls of the strawberry crunch and gently press onto the sides first, then cover the top. Use a slight pressing motion to adhere.
- Cleanup: Use a pastry brush to gently remove loose crumbs from the plate edges.
- Garnish Options:
- Fresh strawberry halves arranged in a circle
- Piped whipped cream rosettes
- Drizzle of melted white chocolate
- Mint leaves for color contrast
- Slicing Technique: Dip a sharp knife in hot water and wipe dry between each slice for clean cuts. For perfect portions, cut into 10 slices (about 1-inch wide at the crust).
Professional Presentation Ideas
Special Occasion Upgrade: Create individual mini cheesecakes in mason jars or dessert cups. Layer crust, filling, and topping for a deconstructed version that’s perfect for parties.
Seasonal Variations:
- Fall: Substitute the strawberry elements with pumpkin spice and gingersnaps
- Winter: Use peppermint and chocolate cookies for a candy cane crunch
- Spring: Try lemon curd and vanilla wafer crumbs
Plating Techniques:
- Dust with powdered sugar using a stencil for a decorative pattern
- Create a strawberry coulis drizzle by blending fresh strawberries with a touch of sugar and lemon juice
- Add edible gold leaf accents for luxury
Storage and Make-Ahead Strategies
Refrigeration: Store covered with plastic wrap or in an airtight container for up to 5 days. The flavors actually improve over 24-48 hours as they meld.
Freezing: This cheesecake freezes exceptionally well:
- Chill completely in refrigerator first
- Wrap tightly in plastic wrap, then aluminum foil
- Label with date
- Freeze for up to 1 month
- Thaw overnight in refrigerator before serving
Portion Control: For easy single servings:
- Slice entire cheesecake
- Place parchment between slices
- Store in airtight container
- Remove slices as needed
Frequently Asked Questions (With Detailed Answers)
Q: Can I use fresh strawberries instead of freeze-dried? A: While you can use fresh, they contain too much moisture which will make the topping soggy. If you must substitute, reduce fresh berries to 2 tbsp finely diced and pat very dry with paper towels. Better alternatives are strawberry jam powder or strawberry milk powder.
Q: My filling seems too soft – what went wrong? A: Several possibilities:
- Cream cheese wasn’t full-fat or was over-softened
- Heavy cream wasn’t whipped to stiff peaks
- Not chilled long enough (minimum 4 hours, better overnight)
- Overmixed when combining ingredients
Q: Can I make this without a springform pan? A: Yes! Use a 9-inch pie dish (no need to remove for serving) or line a regular cake pan with parchment paper strips to lift out the cheesecake.
Q: How can I make this more or less sweet? A: Adjust the powdered sugar in the filling down to 3/4 cup for less sweet. For more sweetness, add 2 tbsp honey to the cream cheese mixture.
Nutritional Information and Dietary Adaptations
Per Serving (1/10 of recipe):
- Calories: 520
- Fat: 36g
- Carbohydrates: 45g
- Protein: 5g
- Sugar: 30g
Dietary Adaptations:
- Gluten-Free: Use gluten-free graham crackers and cookies
- Dairy-Free: Substitute with plant-based cream cheese, coconut cream for whipping, and vegan butter
- Lower Sugar: Reduce powdered sugar to 1/2 cup and use natural sweeteners like monk fruit blend
- Keto: Use almond flour crust, erythritol sweetener, and sugar-free gelatin
The History of Strawberry Desserts: A Sweet Journey
The combination of strawberries and cream dates back centuries, with some of the earliest recorded recipes appearing in European cookbooks from the 1500s. The strawberry shortcake as we know it became popular in the United States during the 19th century, with the first published recipe appearing in 1847.
The “strawberry crunch” concept gained mass popularity in 1981 with the introduction of the Strawberry Shortcake Ice Cream Bar by the Good Humor company. These treats featured vanilla ice cream coated in a strawberry-flavored crumb topping, creating a sensory experience that became embedded in American food culture.
Modern pastry chefs have since elevated this nostalgic flavor combination into sophisticated desserts like our Strawberry Crunch Cheesecake. The contrast of creamy and crunchy, sweet and tart continues to delight dessert lovers across generations.
Pairing Suggestions: Beyond the Plate
Beverage Pairings:
- Sparkling Wines: Prosecco or demi-sec champagne
- Dessert Wines: Moscato d’Asti or late-harvest Riesling
- Non-Alcoholic: Strawberry basil lemonade or vanilla bean iced coffee
Menu Ideas: For a complete strawberry-themed dinner:
- Starter: Spinach strawberry salad with poppyseed dressing
- Main: Grilled chicken with strawberry salsa
- Side: Wild rice pilaf with dried strawberries
- Dessert: This strawberry crunch cheesecake!
Occasions:
- Summer BBQs and picnics
- Bridal and baby showers
- Mother’s Day brunch
- Valentine’s Day dessert
- Birthday celebrations
Troubleshooting Guide
Problem: Crust is too crumbly when slicing Solution: Next time, add 1 extra tbsp butter to the crust mixture. For now, serve with a spoon.
Problem: Filling didn’t set firmly enough Solution: Return to fridge for 2 more hours. If still soft, serve as mousse-style dessert in cups.
Problem: Topping won’t stick to sides Solution: Lightly moisten cheesecake sides with simple syrup or melted jam before applying crumbs.
Problem: Surface cracks appeared Solution: Cover with extra whipped cream or strawberry slices. Next time, avoid overmixing the filling.
Advanced Techniques from Pastry Chefs
Layering Variation: Create a stunning ombre effect by dividing the filling into three portions. Mix one with 1 tbsp strawberry puree, another with 1/2 tbsp, leaving one plain. Layer in the pan starting with the darkest.
Texture Play: Add 1/4 cup mini white chocolate chips to the filling for surprise crunch, or layer fresh strawberry slices between the crust and filling.
Professional Finish: Apply the crunch topping using a pastry bag – fill with the mixture and pipe around the edges for perfect coverage.
Seasonal Adaptations
Summer: Add 1/4 cup fresh diced strawberries to the filling (pat very dry first) Fall: Replace strawberry elements with pumpkin and spice Winter: Use crushed candy canes in the topping for a festive twist Spring: Incorporate edible flowers into the garnish
Final Thoughts: More Than Just a Dessert
This Strawberry Crunch Cheesecake represents the perfect marriage of nostalgia and sophistication. It’s a dessert that will have guests begging for the recipe while simultaneously transporting them back to simpler times. The beauty of this recipe lies in its versatility – equally at home at a casual potluck as it would be on a fine dining menu with some elegant plating.
What makes it truly special is how it brings people together. The familiar flavors create instant comfort, while the stunning presentation makes it feel like a special occasion. Whether you’re a seasoned baker or trying your first cheesecake, this recipe is designed to help you succeed and impress.
As you master this base recipe, you’ll find endless opportunities for creativity. Try different fruit combinations, play with textures, or experiment with presentation styles. The skills you develop here – from proper folding techniques to balancing flavors and textures – will serve you in countless other dessert creations.
So preheat your mixer (not your oven!) and get ready to create what’s sure to become your signature dessert. Don’t forget to share your creations and tag us on social media – we love seeing how you make these recipes your own!
For more decadent dessert inspiration, explore our desserts collection featuring everything from classic pies to innovative no-bake treats. Happy baking!
Strawberry Crunch Cheesecake
Ingredients
For the Crust:
- 2 cups 200g graham cracker crumbs
- ¼ cup 50g granulated sugar
- ½ cup 115g unsalted butter, melted
For the Cheesecake Filling:
- 16 oz 450g cream cheese, softened
- 1 cup 120g powdered sugar
- 1 tsp 5ml vanilla extract
- ½ cup 120g sour cream
- 1 cup 240ml heavy whipping cream, cold
For the Strawberry Crunch Topping:
- 20 golden sandwich cookies e.g., Golden Oreos, crushed (~200g)
- 3 tbsp 45g unsalted butter, melted
- ¼ cup 10g freeze-dried strawberries, crushed
- ¼ cup 30g strawberry gelatin powder
For Garnish (Optional):
- Fresh strawberries
- Whipped cream
Instructions
Step 1: Prepare the Crust
- In a bowl, mix graham cracker crumbs, sugar, and melted butter until combined.
- Press firmly into a 9-inch (23cm) springform pan. Chill for 30 minutes.
Step 2: Make the Filling
- Beat cream cheese and powdered sugar until smooth.
- Add vanilla and sour cream; mix well.
- In a separate bowl, whip heavy cream to stiff peaks. Fold into cream cheese mixture.
- Pour over crust and smooth the top. Chill for 4+ hours.
Step 3: Create the Topping
- Mix crushed cookies, melted butter, freeze-dried strawberries, and gelatin powder.
- Press onto chilled cheesecake before serving.
Step 4: Garnish & Serve
- Top with fresh strawberries and whipped cream.
- Slice with a warm knife for clean cuts.
Notes
- Substitutions: Use gluten-free cookies for a GF version.
- Storage: Keep refrigerated for up to 5 days or freeze for 1 month.
- Pro Tip: For extra strawberry flavor, add 1 tbsp strawberry jam to the filling.